2018 Photographers Dream Gift Guide

Every year people ask me around the holidays what I think would make great gifts for their friends and family who are photographers. So here is my photographer’s dream gift guide for 2018 with links to purchase the items on Amazon to make it all the easier for you.


Camera: For those just starting out getting a camera kit is a great idea.  I am partial to Canon cameras.  Getting a set that also includes a camera bag so you have a nice safe place to keep it is a great idea. For hobbyists that are ready to take the leap to a professional grade camera, I suggest looking into the 5DmkIII or 5dmkIV.  The 5DmkIV is newer, but the 5dmkIII is still used by professionals round the world, and it is considerably less expensive.


Flash: Natural light photography is great, but you can really step up your game by using a speedlite. Flashes are specific to the brand of the camera a person is using.  So be sure to pick out the one that matches your camera brand.  Less expensive third party flashes are also available. The best and most reliable third party brand I have found is Yongnuo.


Lenses: How your image looks is totally dependent on the lens you are using.  For someone who only owns the kit lens their camera came with, a 50mm f/1.8 lens (nifty 50) will be a wonderful addition.  It allows them to shoot better in low light and works as a wonderful portrait lens. The 75-300mm lens also works well as a portrait lens and is great for those who are trying to cover sports games from the stands.


Memory Cards: You can never have enough memory cards.  Sandisk is the very best company out there. Most consumer level cameras take SD format cards.  Pro level cameras typically take Compact Flash cards.


Software: You can’t go wrong with a subscription to Adobe Photoshop and Lightroom.  These two programs are leaps and bounds better for editing and managing photos than the apple Photos app that comes with your computer.


Gadgets: There are so many other items to use in photography that you probably wouldn’t even think of. A card reader helps the photographer get the images on their computer faster and without draining the camera’s batteries. Wireless triggers can let you take your flash off the camera and take photos remotely. If the photographer is using a flash they can ALWAYS use more rechargeable batteries!  If the photographer is doing product photography or just is very concerned about getting colors to be exact, a color checker is indispensable.  Once a photographer really gets into photography they will likely start editing a great deal on their computer.  To make sure what they are seeing is consistent they should use a monitor calibration tool like the colormunki.  If the photographer is doing a lot of editing, over time they will find a traditional mouse to not be the best tool suited for the job.  Instead a wacom tablet will be a lifesaver for their wrists. An external hard drive is a digital photographer’s best friend. All the files will eat up hard drive space like there’s no tomorrow.  A rugged solid state hard drive if you are going to bring it places is a good idea.  And if you are really concerned about the safety of your files, a RAID system like LaCie’s 2Big Thunderbolt is wonderful.


Books: A photographer can always stand to learn more about their craft.  For those who are looking for a practical guide that isn’t too overwhelming, I highly recommend my book.

Win a Copy of Get Off the Green Auto Setting: 2018 Instagram Contest

Have you ever wanted to find out why your photos aren’t turning out the way you hoped?  Now you can!  Post the photo you want help with or critiqued to Instagram with the hashtag #GetOffGreenAutoContest.  In the caption post any helpful information you have, like camera and settings you used and what you hoped to accomplish in the photo and what you don’t like about the photo.  I will write back to you in the comments with suggestions of how you could have made the photo better. Pictures you took on cameras other than your phones are great too.  Just email them to yourself, open the email on your phone, and then save the image to your phone’s camera roll and upload them to Instagram from there.

Pageflex Persona [document: PRS0000038_00062]

On December 15th, 2018, I’ll draw one name from those who submitted an image for critique and followed my instagram feed @VailFucci to send a free signed copy of my book, How to Get Off the Green Auto Setting: A Practical Guide To DSLR Photography for Beginners.  I look forward to seeing your posts!

Photographer’s Dream Gift Guide

Every year people ask me around the holidays what I think would make great gifts for their friends and family who are photographers. So here is my photographer’s dream gift guide for 2017 with links to purchase the items on Amazon to make it all the easier for you.


Camera: For those just starting out getting a camera kit is a great idea.  I am partial to Canon cameras.  Getting a set that also includes a camera bag so you have a nice safe place to keep it is a great idea. For hobbyists that are ready to take the leap to a professional grade camera, I suggest looking into the 5DmkIII or 5dmkIV.  The 5DmkIV is newer, but the 5dmkIII is still used by professionals round the world, and it is considerably less expensive.


Flash: Natural light photography is great, but you can really step up your game by using a speedlite. Flashes are specific to the brand of the camera a person is using.  So be sure to pick out the one that matches your camera brand.  Third party flashes are also available, but they are often known to be less reliable.


Lenses: How your image looks is totally dependent on the lens you are using.  For someone who only owns the kit lens their camera came with, a 50mm f/1.8 lens (nifty 50) will be a wonderful addition.  It allows them to shoot better in low light and works as a wonderful portrait lens. The 75-300mm lens also works well as a portrait lens and is great for those who are trying to cover sports games from the stands.


Memory Cards: You can never have enough memory cards.  Sandisk is the very best company out there. Most consumer level cameras take SD format cards.  Pro level cameras typically take Compact Flash cards.


Software: You can’t go wrong with a subscription to Adobe Photoshop and Lightroom.  These two programs are leaps and bounds better for editing and managing photos than the apple Photos app that comes with your computer.


Gadgets: There are so many other items to use in photography that you probably wouldn’t even think of. A card reader helps the photographer get the images on their computer faster and without draining the camera’s batteries. Wireless triggers can let you take your flash off the camera and take photos remotely. If the photographer is using a flash they can ALWAYS use more rechargeable batteries!  If the photographer is doing product photography or just is very concerned about getting colors to be exact, a color checker is indispensable.  Once a photographer really gets into photography they will likely start editing a great deal on their computer.  To make sure what they are seeing is consistent they should use a monitor calibration tool like the colormunki.  If the photographer is doing a lot of editing, over time they will find a traditional mouse to not be the best tool suited for the job.  Instead a wacom tablet will be a lifesaver for their wrists. An external hard drive is a digital photographer’s best friend. All the files will eat up hard drive space like there’s no tomorrow.  A rugged hard drive if you are going to bring it places is a good idea.  And if you are really concerned about the safety of your files, a RAID system like LaCie’s 2Big Thunderbolt is wonderful.


Books: A photographer can always stand to learn more about their craft.  For those who are looking for a practical guide that isn’t too overwhelming, I highly recommend my book.

Did You Know Get Off Green Auto has a Facebook Group?

Want to interact with the author of How to Get Off the Green Auto Setting and other readers? Join the Facebook group.

Ask questions, get critiques. You can do it all here!

screen-shot-2017-01-04-at-9-35-51-am

Register your copy of the book to gain access to the Facebook group.  We can’t wait to see what you have captured.

dSLRs Are Great for Video Too, If You Know What Settings to Use!

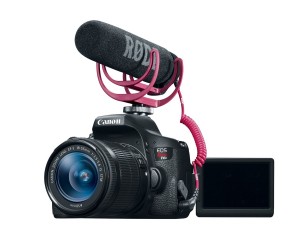
While dSLRs are built to take still photographs, they also can be used to shoot amazing cinematic looking video.  To make your video look like something out of Hollywood though, you need the right tools and need to know what the right settings are to use instead of using the green auto setting.

t6i for video

Tools:

Settings:

  • Movie recording mode: Set your camera to the movie recording mode and press menu.  Now you will be able to set up the basic recording features. Set your camera to the highest recording size possible, ideally 1920×1080. Next set the frame rate. If you are in America you would typically use the NTSC settings for video of approximately 30 frames per second (29.97 fps to be exact). If you are in Europe you would typically use the PAL settings for video of 25 frames per second.  If you are trying to match the look of Hollywood films, set it to approximately 24 frames per second (23.98fps to be exact).  Lastly some cameras give you the option of compression size.  Go with the largest of the compression settings for the highest quality video.
  • Mode dial: Now you need to choose whether you are going to use shutter priority mode (Tv or S) or manual mode (M) to record your video.  In shutter priority mode the camera will automatically balance your aperture setting and your ISO setting for you so that your exposure will stay constant regardless of changing lighting situations.  You can use exposure compensation settings on the camera using the +/- button to record your video with more light or less light than what the camera normally would default to.  If you put it on manual mode, you will have the ability to set the aperture value so you can control how much depth of field your image has.  Within manual mode you can choose to have ISO set to auto to adjust to changing lighting situations automatically, or you can have a specific ISO setting selected.  If you are working under constant, unchanging, lighting conditions, going with full manual is your best option.
  • Shutter speed selection: To make your videos have that cinematic feel you should set your shutter speed to 1/50th of a second.  The faster you set your shutter speed (higher number), the choppier your video will look.  1/50th of a second gives a nice smooth transition from frame to frame that our brain likes to see.
  • Aperture selection: If you want to have control of how much depth of field (how blurry the background is) your video will have you will need to have your camera set to manual mode.  The lens that the camera comes with will work just fine, but for beautifully blurred backgrounds you typically see in movies you will need a lens that opens up more.  The 50mm f/1.8 and 50mm f/1.4 lenses are great for shooting movies.  The blurrier the background you want, the lower the number you should select.
  • ISO selection: if you are in manual mode you can choose to either have the camera automatically select an ISO setting for you or you can select a specific ISO.  The lower the ISO number the better quality (less grainy) the video will be, and the less sensitive it will be to light.  So in low lighting conditions you will need to use higher ISO settings to make sure your video is bright enough. If you are setting it manually, scroll through the ISO settings and look to see on the live view on the back if the video looks bright enough.
  • Neutral Density Filter: If you are shooting on a very bright day, the video may be too bright even at the lowest ISO setting.  If shallow depth of field isn’t important to you, try making your aperture smaller to let in less light by choosing a higher f/stop number.  If it is still too bright you will need to use a neutral density (ND) filter to cut down the amount of light getting in.  It is basically a pair of sunglasses for your camera.  An ND filter screws on to the front of your lens.  ND filters come in constant and variable versions.  Variable versions allow you to dial up or down the amount of darkness.  These are very popular for DSLR video recording.
  • White Balance: It is really important to get the color set correctly in camera before you start recording video because fixing this in post production can ruin the quality of your video.  Instead of using auto white balance, you are better off setting a specific white balance.  You can use any of the presets, or even set a custom white balance (see your camera’s manual on how to do this).
  • Picture settings: DSLRs also have picture settings that alter how much contrast, color saturation, and sharpness is applied to the images recorded.  Most people for video recording use either NEUTRAL or PORTRAIT settings as they retain much more of the information recorded.  You can always add contrast later in post production, but you can’t get rid of it very well.
  • Tripod: Steady video is extremely important! Place your camera on the tripod.  One made for taking photographs is ok, but a tripod dedicated to taking video is better to have if you plan on panning back and forth smoothly with it. Extend the legs to the desired height.  If it has a bubble leveler, use it so that your video is nice and level to begin with.
  • Focus: Some dSLRs are equipped with face detection and follow focus for video recording.  Others are not.  In Hollywood, all the cameras are manual focus.  You can set your camera to manual focus by flipping the switch on the lens over to manual (from AF to M).  Now you can rotate the focus ring on the lens to achieve a well focused video.  The focus ring on the Canon 50mm f/1.4 is much easier to manually rotate than the one on the 50mm f/1.8.  One thing to note, the more depth of field you have (higher f/stop number) the easier it is to get a well focused video, but less light will be able to come in, so you will need to use higher ISO settings to make the sensor more sensitive to light (which makes the video grainier). For moving subjects, keeping them in focus is very difficult.  Be sure to have deep depth of field (higher f/stop numbers)  to help you keep them in focus, so use higher f/stop numbers.
  • Sound: dSLRs have an onboard microphone that is ok, but not great.  You may want to look into getting a microphone that hooks into the camera’s hot shoe and audio input or getting an external microphone, like a lapel mic so that you can record better quality sound. Later in post production you can easily sync the lapel mic audio back up with the video. Just make sure before you start recording to turn the microphone on and to clap in front of the camera.  This will give the same effect as having a clap board (one of those black and white things they use as they start a take).  You will visually be able to see when you are clapping and can sync up the sound as well with it.

Now you are ready to record your video!  Watch some of your favorite movies with the sound off beforehand and you will start to get an idea of how you should film things.  You’ll probably notice there are very few long shots without cutting away, and then cutting back.  The video transitions are usually just simple cuts, not fades, or star wipes, or anything like that.  As your record, try different takes with different angles, and how close up you are to your subject, etc.  This will give you a variety of types of shots to use as you put your piece together.

For editing your video you can use video editors that may come with your computer like iMovie.  Other popular options are Final Cut and Adobe Premiere.  In these video editors you can sync up any external audio you have recorded and you can add music.  If you choose to add music, make sure you use specially licensed music you have paid for ONLY.  Music you bought from iTunes doesn’t count.  Great sites for properly licensed music are SongFreedom.com and MusicBed.com. If you don’t use licensed music, then your video may be taken down from sites like youtube, or the audio may be removed entirely, and even worse, you could get sued by the recording artist.

Hopefully these tips will help you to get great video that looks like it could be straight out of Hollywood instead of straight out of your own home.  For more helpful tips with using your dSLR, check out my book, How to Get Off the Green Auto Setting.

Let’s Get In Touch

Questions about the book? Email me and I will get back to you as soon as possible!